Saturday, May 29, 2010

Fun with Leftovers: A Take on Chicken "Alfredo"


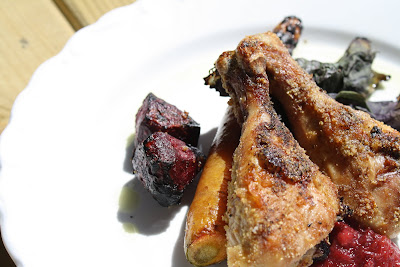
I have a habit of packing up leftovers with the best of intentions and then never using them. This habit is much different than my penchant for freezing raw ingredients like egg whites, bananas on the turn and filling the stock container because I have absolutely no problem using the raw ingredients. In our house, we rarely eat the same thing twice and leftovers somehow get left in the cold and I really hate wasting food. To be fair, we rarely have leftovers but every once in a while there is a container tucked in the fridge. This dinner was borne out of a container of beautiful barbecued chicken drumsticks and beets and Miss N.'s request for spaghetti.

I am also unable to make a decent "white sauce" for pasta. I'm serious, the delicate creaminess combined with a great flavour always escapes me. I can only achieve one aspect of a North American cream sauce. I don't know why and if I want something more traditional-like I have to rely on Mr. ... I am sure you have noticed that I am dancing around calling this sauce "alfredo". That is because that heavy white sauce all gluten-intolerant people fear is not actually alfredo. In my trusty and very old "Mama Leone's Italian Cookbook" has a beautiful recipe for Fettucini al'Alfredo of Rome and the sauce is simply 3/4 cup fresh creamer butter and 6 tablespoons freshly grated parmesan. How simple is that?


All of that ramibling aside, I didn't follow my own strict food rules. This is totally the North American version of alfredo. Ahem. In a way. Remember how I have to cheat when it comes to creamy sauce? Here's how:

The Sauce

one sweet onion
3 gloves garlic
1/2 block medium tofu
splash of soy milk
S&P to taste

1. In a pan on medium heat add the diced onion. Sweat the onion to release its juices and begin the caramelization. You are not actually going to brown the onions, just cook until translucent.

2. Add the garlic.

3. The tofu (the secret ingredient!): blend it until smooth in the blender. I use a medium tofu and with just a splash of milk it is efficiently turned into a really thick "heavy cream". Yeah, that's right. Add it to your onions and garlic. Stir until heated through.

When you pasta is cooked al dente, don't you dare rinse it. I'll be very unhappy with you. Why? All that starch on the pasta (yes, it is on gluten-free pasta) binds the sauce to the pasta and that's how you get flava! Really. To prevent the pasta from sticking together put it back in the empty pot and spoon some of the sauce over the pasta and stir. When ready, plate your pasta then pour the rest of the sauce over the pasta. Ta da! Fancy pants pasta at this point it is completely vegan. For the next part you can nix the chicken if you want to keep it vegetarian.

We're not done.


The Chicken and Beets

3 cooked chicken drumsticks (mine were barbecued by Mr. the night before.)
barbecued beets (again, barbecued by Mr. Barbecue)
a handful of herbs from the garden*

1. Dice the chicken (obviously once it is off the bone!) and quarter the beets. I used striped candy beets from Ted Hutton at the Halifax Farmer's Market.

2. Sauté in a hot pan with olive oil.

3. In your pestle and mortar mash up your herbs with coarse salt (the roughness of the salt helps break up the herbs) and a dash of olive oil.

4. Add to the chicken and beets. Stir for a minute then add this to your plated pasta. If you read this recipe the timing is off, obviously don't plate the pasta then do the chicken. I'm sure you can all multi task!

*The herbs: It's up to you. The sauce on the pasta is a lovely base that supports your preferences. I used a generous handful of garlic chives, minette basil and purple basil.

Top the chicken with slices of parmesan, obviously I used a goat parmesan from Rancher's Acres and it was perfectly firm and crumbly with just a great punch of saltiness. There you have it, perfectly gluten free, full of protein and you can use up some leftovers! Feel free to mix up the veggies, I always see a recipe as a loose guide. In fact, I was sewing the other day when I realized I rarely follow directions to anything... sometimes it works, sometimes it doesn't but I follow my own vision. You should do the same.

Friday, May 28, 2010

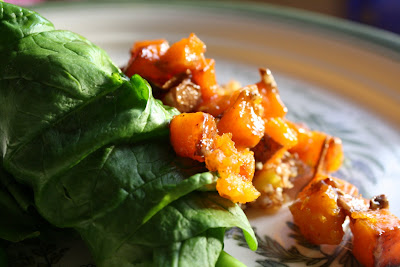
Photo Friday: Toasted Quinoa and Honeyed Sweet Potatoes


• toasted quinoa • honeyed sweet potatoes • spinach roll-up


Tuesday, May 25, 2010

Rhubarb Banana Gluten-Free Muffins

Bubs is sure he wants the muffin in front.

I am in the throes of a full-fledged rhubarb obsession. I was so easy to dismiss this beautiful fruit? vegetable? stalk of deliciousness? when I was a teenager that now I feel like I need to seriously make up for my prior dismissive attitude. What gets me the most is that my mom has enough rhubarb to build a house out of it and I always turned my snooty little teenage nose up at it and now I live a couple of provinces away. Teenagers are such brats, but then again, if they weren't I'd have to share the world's rhubarb and I can be territorial.


No, no. He thinks he wants this one.

Another recent obsession of mine has been figuring out how to make a decent gluten-free crumble. I love(d) crumbles but since oats are off-limits, even though there are gluten-free oats in the world I'm still leery, so I'm left to figure it out myself. Lauren at Celiac Teen has something that I think is definitely coming close (good call on the tapioca pearls!) with a crumb mix which I've filed away in my little brain with all the other half-recipes I have floating around in there. My make-shift "crumb" is alright but I'm not completely satisfied with it. The reason why I'm adding it here is so that perhaps someone will have a suggestion and also because in this form it's still pretty yummy! Ideally I would add coconut flour and brown sugar to the amaranth and shredded coconut to really bring out that crumbly mix but unfortunately I did have any brown sugar. As for the coconut flour, I'm still a bit annoyed with coconut flour after the macarons fiasco and it's keeping it's tropical little butt out of here, i.e. I haven't bought any more.

This recipe yields about 6 giant muffins but I'm sure that I could have expanded on that if I had added a touch more liquid. I'm finding that gluten-free baking has completely ruined
re-worked my baking confidence and everything I thought I knew about baking. Mr. and I used to have a farmer's market based baking business and all that experience is kind of out the window. I'm getting there but it's a process. The properties I always took for granted when working with wheat flour have fled like the cat when Bubby is stomping around and pretending to be a monster.

Here I am, editing and finishing this post a few days after I started writing it. What that means is that the original recipe has been completely transformed and only good things have come with that time. This recipe is perfect for a morning batch of muffins because it is packed full of protein (that means energy!) without the fat but it still full of flavour. My whole family loved them, Bubby actually tried to con us into letting him eat two at breakfast yesterday! If you wanted to save time you could always throw together your dry ingredients the night before and just stick it in the fridge. If you do this, do not (I mean it!) mix your dry with wet: Baking powder has a lifespan of about 30 minutes once it comes in contact with moisture. You'll have very yummy pucks if you do this, how do I know this? Mr. and I tried to save time one week for the baking business by pre-mixing a bunch of the recipes. Come Friday morning (the day before market) we were out of ingredients and full of little disks. Not cool.

Secret deliciousness.
The Recipe

65 g white rice flour
45 g teff flour
45 g quinoa flour
45 g soy flour
20 g arrowroot flour
6 g guar gum*
3 tsp. baking powder
1/2 tsp. salt
2 tbsp. cinnamon
2 eggs
100 g sugar
1/2 cup yogurt (I used a rich, plain goat yogurt.)
3 bananas
4 tbsp. soy milk/horchata
2 tsp. vanilla

reserve: rhubarb mint jam and quark - or another creamy, tangy cheese. I get my quark from Ranchers Acres, a goat farm in the Annapolis Valley. Their products are simply beautiful. If you do not have rhubarb jam you could aways stew a couple of stalks of rhubarb and use that, have fun with it!

1. In one bowl mix all your dry ingredients. I like to use a whisk it until it is very fine and you can't see where one flour begins and the other ends.

2. In a separate bowl mix the wet ingredients, except the milk. This will be used later if you find the batter is too thick.

3. Make a well in the dry ingredients, pour in the mix of wet ingredients and stir.

4. If needed (I certainly did!) add the milk and until a smooth batter.

5. Ladle into greased muffin sheets. Only fill the cups halfway because this is where you add the secret delicious part. Spoon about a dessert spoon each of rhubarb jam and quark (you could use any soft, tangy cheese). Cover completely with more batter. Sprinkle the crumb mix on top.

6. Bake at 350F for 30-35 minutes or until a toothpick in the centre comes out clear.

My muffin pans are quite large, if yours are not so big adjust the time down. The first time I made this recipe I set the time for 20 minutes and then judged from there, you should no doubt do the same thing if you are concerned about over-baking.

The Crumb Mix

Oh, this baby came about after great trial and error, and most of my amaranth. I also made about 8 million cups too many.

In a non-stick pan combine equal parts shredded coconut and amaranth. Toast on medium heat for about 5-10 minutes. After it has started popping a bit (it really does sound like popcorn!), sprinkle approximately a tablespoon of white sugar on top. Toss a couple of times and remove from heat.

I store the extra in a tupperware container in the fridge. It keeps really well and it is a fantastic coating for chicken (thank you hubby!). It's pretty versatile so you can definitely keep it around for a bit.

I am not much of a breakfast person, though I do love my brunch! That being said written, I could definitely eat these muffins every morning! I always end up using soy flour, despite my reservations about soy ... does anyone have an alternative they like? I am still fairly new to gluten-free baking and I'm still testing all my options.

Horchata Fortified: A New Spin on "Rice Milk"


My kitchen table isn't really that dirty. This a yard sale find in need of refinishing!

This past Sunday morning I was absentmindedly watching the Food Network and playing on the computer when a little something piqued my interest: rice milk, more specifically horchata.

Horchata is a sweet rice milk, originating from Mexico; there is a Spanish link but I am not exactly an expert in Mexican food history. What had me truly interested, enough to ignore the host's exuberance on my quiet Sunday morning, was that this horchata had the potential to be a replacement for soy milk. I tend to use goat milk in my cooking so the majority of soy in the children's lives comes from soy milk but it does have me a bit concerned. Bubby (a.k.a. the Boy) won't drink goat milk, unlike his sister who would possibly (and I hope only temporarily) sell her brother for goat milk, that's how much she loves it. If you are unfamiliar with goat milk .. well, let's just say that the muskiness of some goat's cheese isn't for nothing.

My sweet babies are trained to be skeptical of any new food they may encounter and there is nothing cuter than a 2 year old asking, "dis have cow milk in it?". I think I have found success with this horchata: Miss N. (a.k.a. Girly) and my mom were immediate fans, Bubby needed a bit of coaxing and Mr. seems to like it. I am excited about the potential of this recipe: For the first batch I used vanilla and cinnamon to break us into it (I despise wasting food), just in case the texture was off it would still be palatable. I didn't have anything worry about, this is fantastic! There is a slight earthiness from the quinoa and all the starch from the rice lends a beautiful silkiness that I absolutely love about our favourite soy milk.


I wasn't overly worried about timing when I made the original batch because the kiddies were off at their grandparent's for the week-end. As soon as we get through this batch (which won't take long at the current rate!) I plan on tweaking it a little in order to do a stove-top version. The Food Network show I was watching was with a host named Sunny and she prepared her's very quickly on the stove, also, she added peaches for a sweet, spring flavour. I think this recipe is a great base for further experimentation. After all, that's what we're all doing in the kitchen, right? Playing around and experimenting. Now that we're all adults, ignore mom's advice: Play with your food!

The Recipe

1 cup white rice
1 cup quinoa
4.5 cups water (plus and addition 2-3 for later)
3 cinnamon sticks
sugar to taste (I think I used about 1.5 cups)
tablespoon vanilla, if you are so inclined

1. Grind the quinoa and rice into a fine grit. I used our very old and very cheaply made kitchen wizard blender thing and though it smoked and growled at me, it got the job done.

2. In a bowl combine the 4.5 cups water, cinnamon sticks, quinoa and rice. Cover and stick it in the fridge.

3. Find something that will keep you busy for the next day or two, hence the need to adapt this recipe to the stove top!

4. After staring at your fridge for almost two days, remove the bowl. Strain through a metal sieve. The water should be a really creamy white and it is gorgeous! I wanted to drink it but restrained myself: Keep in mind that it is starchy water. Yuck.

5. Blend all the leftover grit of rice and quinoa, get it as mushy as you can.

6. Strain the muck (appetizing!) through your metal sieve and cheesecloth. Squeeze the heck out of it. I put a ceramic cereal bowl on top of the cheesecloth and press down like I have Arnold Schwarzenegger muscles. I'm not sure if you need to be this enthusiastic.

7. Add your sugar and another 2-2.5 cups water. Refrigerate.

I don't know about your family but we spend an atrocious amount of money on soy milk, I am sure it's the equivalent of a family who drinks cow's milk, even though soy rarely goes on sale; nor is it sold at Costco or in bulk. I am really excited at the possibility that we could effectively reduce our reliance on soy milk, the amount of waste it generates (the not being sold in bulk thing is a pain), and the associated health concerns. Before anyone freaks out about soy being healthy: I am fully aware that many of the issues surrounding soy milk comes from it being once of the most genetically modified vegetables on the planet. Scientists have been playing around with soy beans for a very long time. The soy milk our family uses comes from a company that has made a commitment to organic and sustainable practices and our tofu comes from a local farmer and producer (Acadiana Soy!) that has made the same commitment. That being said, soy still sometimes freaks me out and I'd rather err on the side of caution.

Just a note: This is very much gluten-free! Drink up, my gluten-intolerant/allergic friends!

Monday, May 24, 2010

Toasted and Creamy Quinoa


If quinoa can be toasted, how is it also creamy? Easy-peasy. Toasting the quinoa prior to cooking it reveals a beautiful and subtle nutty flavour that is sometimes drowned out by the earthy quality some people tend to find undesirable with quinoa. I'm the opposite: I love earthy foods, I find them to have a freshness that feels like you are biting into a piece of the farm (not the farmer!) who grew the produce, just for you. As we all know, quinoa is a complete protein; this means that you don't need to combine it with another food to truly capture all the complex amino acids that are generally found in meat. This makes quinoa perfect for vegetarians and vegans (although, you'd have to swap the quark for a vegan cream cheese).

The Quinoa

1-1.5 cups quinoa
2 stock cubes*
water
salt, pepper to taste
2 tsbp. quark or other creamy cheese

1. Heat olive oil in a pan. You'll need just enough oil to lightly coat the quinoa kernels so they don't scorch.

2. Toast the quinoa. This is the same principle as popping your own popcorn. Toss it a fair amount to avoid burning. Just know that every time you toss it, the quinoa loses a bit of the heat.

3. Once sufficiently toasted (about 5-10 minutes) add water and the stock cubes.** Cook covered and on medium low heat for 20-25 minutes, or until the "tails" are released. Toasting the quinoa first lowers the cooking time in the water. You also need a bit less water.

4. Stir in enough cheese until creamy. I do believe I may have started with 2 tablespoons then added more later, so the 2 tablespoons is a good base. Add more at your discretion. Salt and pepper to taste.

*I use stock that I make myself from leftover bones and veggies. You can see how to do it here. I freeze some of the stock in ice cube trays for those times when I need a punch of flavour but don't want a whole bunch of stock. Beware packaged soup stock, often it has wheat in it.

**A few years ago one of Mr.'s cousins stayed with us for a bit. It was quite an experience and while I learned many things, my favourite was how to make rice (or another grain) without measuring. Pour your rice/quinoa into the pot and add enough water so that it is about 2 centimetres above the top, bring to a boil and reduce to medium low like usual. Works every time.

This makes an excellent side to any meal as it is light and fragrant and it covers a lot of nutritional needs. Enjoy!

Sunday, May 23, 2010

Halibut with a dash of Wasabi


It is a sad reality that most of the commercial fish available in Nova Scotia comes from fish farms. It is not only sad it is despicable. The harm to the local waterways is palpable and terrifying, particularly when you think that these giant fish (over-feeding of soy based products that often feature other less than desirable products) can over take the local ecosystem and new research shows farmed fresh is not healthy. What's a girl to do? Especially when she loves her family, nature and her health? Buy local, sustainable fish, that's what she does. Well, often that means smelt and Mr. can be picky about his fish ... until we discovered Evan's Fresh Seafood. Jimmy is the lovely son-in-law of Evan and he treks all over the mainland, bringing Evan's seafood to the likes of me. I actually had the audacity to ask Jimmy if any of this fish was farmed (there is a certain very popular fish market at North America's oldest farmer's market who peddles farmed fish) and he smirked in a kindly Adam Sandler way and said, "We go out on our boat. We catch fish." That settled it. Evan's Fresh Seafood is officially the only fishermen for us.

I don't think it's any secret that I love aioli and I realized when writing up this recipe that I tend to use aioli with fish. Why? Beyond the obvious delicious factor, aioli (if made properly) is perfectly balanced between a creamy and rich sauce but it lighter so it won't overpower the fish. Also, it is incredibly versatile. I had found a package of powdered wasabi tucked away in the fridge, leftover from a sushi making endeavour and I was also inspired by an episode of Roger Mooking's Everyday Exotic where he made a Coconut "Shake and Bake" for chicken. I planned on barbecuing the halibut I had procured from Evan's the day before so I knew I would not be needing the "shake and bake" crust; instead, I incorporated the general theme of flavours into the dish.

A note on wasabi: The powder has the same capacity to burn the living (expletive) out of your sinuses if you inhale it - just like all those times you dabbed too much on your sushi. I worked in a sushi restaurant (Milamodo! A fantastic and laid back sushi restaurant in Halifax) and watched Steven, our sushi chef, lean as far back as he could, a grimace on his face whenever he mixed the wasabi. This is a man who has been cutting fish for years and if he is leery of wasabi, I hold my breath when using it. Seriously. I very quickly stirred it into the marinade and when crushing the herbs for the aioli I made sure to put it on the bottom so it wouldn't be stirred up too much.

This fish evokes all the sweetness and complex spice of an Asian meal while retaining the rustic feel of Nova Scotia that I love so much. It was light yet filling so it would make a perfect lazy lunch for a sunny day where you sip a cool and crisp white wine; it also came together quickly enough that it makes a full dinner. I served this with lemony fiddleheads my Mr. prepared and a toasted and creamy quinoa. Guess what that makes it? Largely local and super healthy. Bonus.

The Marinade

Bragg soy sauce*
lemon juice - approx. the juice of one fruit
apple cider
2 tbsp. honey
tsp. wasabi

1. Combine equal parts soy sauce and apple cider in a shallow-ish pan (the liquid needs to spread across the bottom of the pan and cover the fish), add the rest of the ingredients and stir.

2. Nestle the fish in and allow the marinade to cover the fish. Refrigerate for up to one half hour. I think I've covered this before: Don't marinate fish for more than 30 minutes as it will break down the flesh of the fish and it will be too mushy.

*A fantastic gluten-free and organic soy sauce - it tastes just like wheaty soy sauce only better because you won't feel like crap after you eat it. They also make a beautiful raw apple cider vinegar that comes with the mother which you would need if you were so inclined to make your own vinegar.

While the fish is marinating you can start throwing together your aioli, play with your kids or do whatever you want. I like to make the aioli in this time (and get the kids to help - if they aren't captivated by the ever sweet Curious George) so it can scoot into the fridge to cool off and allow the flavours to marry.


The Aioli

arugula
shredded coconut
coarse salt
wasabi
fresh mint
3 farm fresh egg yolks
olive oil

1. Crush the herbs, coconut, salt and wasabi in a pestle and mortar. From the picture above I'm sure you can surmise that I use a bowl and the handle of a lemon reamer for my makeshift pestle and mortar. Get creative. I have the world's worst stocked (appliance/gadget-wise) kitchen.

2. Once everything is broken down to a fine paste drop in your egg yolks and begin whisking.

3. Add a drizzle of olive oil at a time. The more oil you add the thicker the aioli will become: Trust me. Careful, olive oil tends to be a strongly flavoured oil and it can easily overpower the delicate flavours.

4. Refrigerate. Just so you know, this is totally inauthentic, but since I like to use unconventional ingredients as opposed to the usual garlic the herbs need the time to meld.

Barbecue your fish on medium-low heat. I like to light my barbecue and let it sit for a good 10 minutes to get it really hot. Plus, you'll have beautiful sear marks on your fish if you do this.

Brush the marinade on top of the fish periodically to retain the moistness in the fish. For the last five minutes of cooking, flip the fish to sear the other side and kill any of the bacteria from the marinade.

To serve: Top with the aioli and enjoy!

Macarons Marathon: The Good, the Bad, the Ugly


I think as food bloggers most of us are reluctant to show off our mis-steps in the kitchen, particularly when we want to be known as a resource for people who don't have a lot of experience in the kitchen. I know I feel that way: I hate thinking that I've somehow failed in the kitchen (I'm a perfectionist and sometimes that can really bite you in the ass!) and I'd like to keep all that hidden from you, my lovely readers. But, while I am honest but vague with you about my personal life I think it would be dishonest to not show you when things don't go exactly as planned. That's life, right? This brings us to the Macarons Marathon of Friday night.

I had been stockpiling egg whites - I don't even know how I keep ending up with so many, but there had to be about 12 egg whites waiting for greatness. I was suddenly struck by inspiraton: I would embark on a macarons marathon. I am determined to get these delectable treats right. I think I may have mentioned that macarons are not available (to the best of my knowledge) in Halifax and I have a sneaking, subconscious suspicion I am going to change that and as it stands, my macarons are not good enough. Remember the perfectionist thing? My lovely Mr. and extended family has gobbled them up happily but they will only get better from here.


I set about to make three varieties: Chocolate with peanut butter icing, vanilla and rhubarb and a coconut with cinnamon icing. In the end, not one was "traditional". Pierre Hermé would not be happy with me. Don't get me wrong, those that made it to the oven and beyond were delicious but not exact. I have a few ideas about where I went wrong and I plan on incorporating the changes for the next time.

Chocolate w/ Peanut Butter Icing
(adapted from Robyn Lee's recipe at seriouseats.com)

225 g icing sugar
120 g ground peanuts (careful when grinding - you don't want to make p.b.)
5 g cocoa powder
110 g egg whites
30 g granulated sugar
pinch salt

1. Pass the icing sugar, cocoa and ground peanuts through a metal sieve to make a fine powder. I do not have said metal sieve so I resort to using a silicone (it has more give than rubber) spatula to break up the lumps.

2. Whip the egg whites to stiff peaks. As the whites start to come together and are just beyond foamy, add the pinch of salt.

3. At the soft peak stage sprinkle the sugar over top and continue whipping until the whites form hard peaks.

4. Fold in the ground nuts and icing sugar. It should look like lava.

5. Pipe into 1-1.5 inch rounds on a parchment or silicone lined baking sheets. Tap the baking sheet on the table or counter and leave to set for about 30 minutes. They will form a dry shell under which your "feet" (the beautiful crunch) will form.

6. Bake at 325 F for 10 to 11 minutes. Use a wooden spoon to keep the oven cracked for air circulation. Rotate the pan after 5 minutes for even baking.*

7. Once cool, remove from the pan and sandwich with the peanut butter icing.

stiff egg whites, waiting to be transformed.

*I have an idea this recipe was written for a standard oven, if you are lucky enough to have a convection oven you probably don't need to do the rotating or wooden spoon trick. Plus, I envy you.

Peanut Butter Icing

Like usual, I didn't measure for icing - I'm sorry. I'm such a nightmare for people who crave exact measurements! You need your icing smooth and creamy, if it's too dry (it'll crack when you draw a spoon through it) it will not work. It won't spread and the pressure of trying to spread it will crack your macarons.

peanut butter
vanilla
icing sugar
boiling water*

Mix together in a bowl.

*Use this to your discretion: Hot water is a good way to add liquid to your icing without the extra fat of more p.b. or the "shell" that comes from using milk.

Result: This batch did not form the typical and desirable feet of traditional macarons. Delicious and rich with a familiar flavour combination these are more like a regular sandwich cookie.

Why: I think the peanuts are simply too high in fat and oil to allow the macarons to have their usual light lift. Next time I think I'll use significantly less peanuts, perhaps a mix of ground almonds and peanuts. I was reticent to grind the nuts lest I end up with peanut butter and I don't think I could get it fine enough. Lesson learned.


Coconut w/ Cinnamon Icing

Didn't happen: I used coconut flour and didn't make the adjustments, I plead distraction due to Modern Family. I'm finding that coconut flour has a higher volume than other gluten-free flours and every time I use coconut flour, it throws me under the bus.

I really, really wanted a cinnamon version for two reasons:
1. My mom loves cinnamon and has been on a cinnamon kick recently.
2. She's visiting, hence needing a cinnamon variety!

Since batch number two didn't work out I decided to incorporate the flavours into batch number three.

Coconut Cinnamon w/ Rhubarb Mint Jam

225 g icing sugar
100 g ground almonds
15 g coconut flour
10 g cinnamon (quite the kick but it's beautiful!)
110 g egg whites
30 g granulated sugar

I'm not going to write down the instructions because I'm sure you can figure it out! The directions are pretty standard: Whip the whites, incorporate your dry ingredients and bake. For the filling I used a smear of my rhubarb mint jam. Delicious!

It's best to allow your macarons to rest overnight, or at least for a few hours. Why? Because the icing or jam will meld with the cookie and the outer shell remains crisp and the flavour of the filling permeates the cookie and it's just much better. Take my word for it. Yummy when just made, divine when you wait!

Results: This batch formed the feet, but my goodness they are ugly! For some reason the macarons retained the swirls of my inexpert piping and they are just kind of ugly.

Why: Thinking back on it, I don't think I properly measured my dry ingredients. I had just scared the crap out of the cat when she was hunting an extension cord and in one quick movement I made it jump off the table (she flipped upside down! I know this sounds mean but she hunts my toes in the morning) and was a little distracted. Plus, I was watching re-runs of Modern Family and Claire is my girl - Mr. always gives me a sideways glance when she does something that is so, um, me.

I fully intend to keep trying and I challenge other food bloggers to reveal their kitchen mishaps. Why? Because no one is perfect and we learn more from those mistakes than all the times our recipes turn out perfectly.

Best of luck with your macarons endeavours! For a couple of resources check out Cristina who has a lot of experience and of course, the unflappable and wonderful David Lebovitz.

Monday, May 17, 2010

The Healing Wonders of Jam: Rhubarb Mint Jam


Have you ever had a period in your life where something ugly reared its ugly head and consumed you, only to spit you out a different a slightly scarred person? In that time you may feel a heavy weight that mysteriously disconnects you from your body and and makes your mind weightless as your emotions cavort and wreak havoc upon your life. It is a strange and awful world where words make little sense and the familiar becomes a source of anxiety and distress.

To all the wonderful people who follow my little slice of blog heaven, thank you. Discovering your new comments over the last few weeks as I desperately wanted to write and experiment in the kitchen (but couldn't) has been a real source of joy.


My first venture into the kitchen after the seams of the world came undone was to make something for the mothers in my life. My mother and mother-in-law are two very supportive and loving women and I wanted to honour them in some small way this Mother's Day and there is no better way to show that than with a homemade gift. You are no doubt wondering why I am writing about Mother's Day a week late. Well, it's because I didn't get any pictures of that batch of jam (thanks to the foggy head space), so I had to wait until I made another batch.

The other day I ventured into the kitchen to concoct another batch of this lovely jam and I must say, I'm happy with the results. I didn't bother processing in a boil water bath because I didn't want to waste the snap lids, but feel free to do so. Process for 10 minutes in a boil water bath, just make sure there are a few inches of water above the jars.

The original recipe was developed by Marisa at Food in Jars and in it's original incantation it was a rhubarb and rosemary jam. If you like making your own preserves you should definitely head over to her blog, she is definitely a fantastic resource! I made a few changes, some borne out of taste preferences (mint for rosemary), some out of necessity (a lack of pectin).


The Recipe

4 cups chopped rhubarb
3 cups sugar
1 cup water
2-3 generous sprigs of mint

1. Crush the mint a bit to release the oils. You could even wrap the crushed/chopped herbs in cheese cloth for easier removal.

2. Combine all ingredients and bring to a soft boil, make sure the mix in bubbling. I stir this fairly often so that it won't stick to the bottom of the pot.

3. You'll notice I didn't use pectin, instead I just let it simmer on medium until it reached 220* degrees. Feel free to use pectin. If you do so, add the pectin after the rhubarb is broken down, stir it in and boil for 2 minutes. Marisa notes this jam can overcook very easily and the woman speaks the truth. Remove the pot from the heat once it reaches 220 or after the 2 minute mark. Remove the mint.

4. Ladle into jars. It's your choice here; either you can process in a boil water canner for 10 minutes or allow to cool and treat it as if it were freezer jam (which means stick it in the freezer!).

Ta da! Jam. This is divine on a slice of toast or even as an impromptu chutney for chicken or pork. I even caught my little girl fishing out a spoonful this morning which she ate straight up. Making this jam was a holistic experience and while it may not have the same profound effect on you as it did me, it's damn good jam.

Thursday, May 6, 2010

Zen and the Art of Barbecuing Everything!

Grilling Bliss


*** GUEST POST BY MR WHITEPLATES ***


Barbecue season is my time. Nothing cries summer like the burning smell of eyebrows after a good fight with the electric ignition button.

After a leisurely stroll through the Farmer's Market, Ms WP and I found ourselves with some amazing picks, from beautiful sweet carrots (the yellow ones) to fresh chicken, smooth quark and rhubarb!


Fresh Chicken
Rhubarb
Root Veggies (beets and sweet carrots are nice)
Pak Choi (bigger leaf than bok choi, a little sweeter)
Quark (or chevre, if you prefer)
Onion
A Lemon
Sea Salt, Spices
Oil


So, just smack your chicken with some sea salt, cornmeal, onion powder, garlic powder and perhaps a little chopped rosemary, if you'd like. Throw it right on the hot barbecue, with a couple of washed sweet carrots, (or peeled if they're not no-spray or organic) and a few peeled, salted beets.

Veggies on the barbecue are simple and fab; it's all about the oil. Just put a splash or two of olive oil in a small dish with sea salt, perhaps lemon juice and whatever spices you desire, and brush the veggies with the mix as they cook. Because I wanted some serious colour on my carrots, I also put sugar in my oil mix to both taunt the fire, and to crust the carrots in a thin layer of burnt caramel.
If you follow suit, take care not to brush them in oil until just a minute before they're done, to give them a nice crisp char, but not blacken them completely.

As for the Pak Choi, spread a leaf with a little quark, salt, pepper and thinly-sliced onions, and roll like maki. Roll another leaf of pak choi around it, and you're ready for grilling! They burn easily, so keep them away from flames, on the coolest bart of the barbie.
Pak Choi Rolls

As for the Rhubarb Chutney, just light the side-burner (if you're fortunate enough to have one), and sear some chopped rhubarb in a hot pan with olive oil. Add salt and white pepper, and when the rhubarb starts to char a bit, add a good spoon of sugar and reduce the heat. Just before the rhubarb turns to mush, it's done! Put it on the plate in anticipation of chicken!

Just before the chicken is done, squeeze a little lemon juice over.


The rhubarb chutney provides a fresh, sharp sweetness that compliments both the salty and sour tones of the chicken, and the earthiness of the root veggies. Your pak choi rolls should be toasted crisp on the outside and soft and sweet inside.

mmmmm.